Light Microscope
Key Stage 2
Meaning

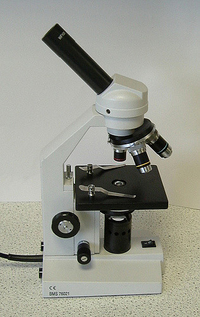
A microscope is piece of equipment used to make small objects appear larger.
About Microscopes
- Microscopes can be used to see things too small for our eyes to see.
- Micro means 'small' and scope means 'small'.
Microscope Images
Key Stage 3
Meaning
A microscope is a piece of equipment used to make small objects appear larger.
About Microscopes
- Microscopes use convex lenses to magnify an image.
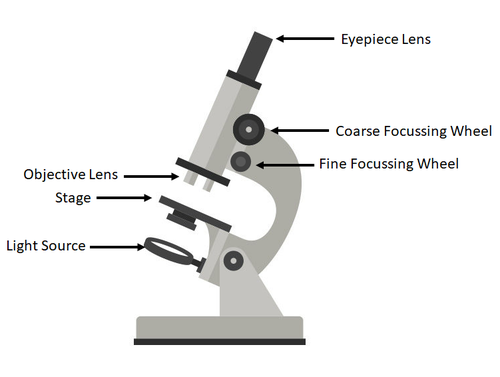
- The parts of the microscope are shown in the diagram below:
- Eyepiece Lens - This is the lens that you look down.
- Coarse Focussing Wheel - This moves the stage by a large amount to bring the image into focus (make the image clear and not blurry).
- Fine Focussing Wheel - This moves the stage by a small amount to focus the image carefully (make the image clear and not blurry).
- Objective Lens - This is the lens next to the specimen that magnifies the image.
- Stage - This is where the sample is placed.
- Light Source - This can be a lamp or a mirror used to shine light through the specimen.
Preparing Specimens
To see an object clearly with a microscope a specimen must be prepared first.
- 1. A small specimen is placed on a glass slide.
- 2. A dye is used to colour the specimen so it can be seen more easily under the microscope.
- 3. A cover slip is placed on the specimen to flatten it.
- 4. Tissue is used to absorb any excess dye.
- 5. The glass slide is placed on the microscope stage.
Key Stage 4
Meaning
A light microscope is a device used to observe small objects using visible light.
About Light Microscopes
- A light microscope cannot be used to view anything smaller than about 0.2 micrometres.
- Light microscopes can be used to view objects as small as bacteria but cannot be used to view viruses.
- Eyepiece Lens - This is the lens that you look down.
- Coarse Focussing Wheel - This moves the stage by a large amount to bring the image into focus (make the image clear and not blurry).
- Fine Focussing Wheel - This moves the stage by a small amount to focus the image carefully (make the image clear and not blurry).
- Objective Lens - This is the lens next to the specimen that magnifies the image.
- Stage - This is where the sample is placed.
- Light Source - This can be a lamp or a mirror used to shine light through the specimen.
Magnification Equation
Image Size = Object Size X Magnification
\(Magnification = \frac{ImageSize}{ObjectSize}\)
Preparing Specimens
To see an object clearly with a microscope a specimen must be prepared first.
- 1. A small specimen is placed on a glass slide.
- 2. A dye is used to colour the specimen so it can be seen more easily under the microscope.
- 3. A cover slip is placed on the specimen to flatten it.
- 4. Tissue is used to absorb any excess dye.
- 5. The glass slide is placed on the microscope stage.
References
AQA
- Light microscopes, page 11, GCSE Biology, Hodder, AQA
- Light microscopes, page 11, GCSE Combined Science Trilogy 1, Hodder, AQA
- Light microscopes, pages 12, 13, GCSE Biology; The Revision Guide, CGP, AQA
- Light microscopes, pages 12, 13, GCSE Combined Science; The Revision Guide, CGP, AQA
- Light microscopes, pages 25, 26, GCSE Biology, CGP, AQA
- Light microscopes, pages 25, 26, GCSE Combined Science Trilogy; Biology, CGP, AQA
- Light microscopes, pages 4-5, GCSE Biology; Third Edition, Oxford University Press, AQA
- Microscopes, pages 12, 13, GCSE Biology; The Revision Guide, CGP, AQA
- Microscopes, pages 12, 13, GCSE Combined Science; The Revision Guide, CGP, AQA
- Microscopes, pages 25-27, 292, GCSE Combined Science Trilogy; Biology, CGP, AQA
- Microscopes, pages 25-27, 372, GCSE Biology, CGP, AQA
- Microscopes; observing onion cells, pages 25-27, GCSE Biology, CGP, AQA
- Microscopes; observing onion cells, pages 25-27, GCSE Combined Science Trilogy; Biology, CGP, AQA
Edexcel
OCR
- Light microscopes, page 12-14, Gateway GCSE Biology; The Revision Guide, CGP, OCR
- Light microscopes, pages 11-13, Gateway GCSE Combined Science; The Revision Guide, CGP, OCR
- Light microscopy, pages 22-23, 25, Gateway GCSE Biology, Oxford, OCR
Beyond the Curriculum
Advanced Microscopy Techniques
While you've learned about the basic light microscope in your curriculum, the world of microscopy has advanced significantly in recent years. Scientists use cutting-edge techniques to explore the hidden microcosmos. Here are some exciting concepts students usually encounter in university-level courses:
1. Electron Microscopes
In addition to light microscopes, there are electron microscopes that use beams of electrons instead of light to achieve much higher magnification. Scanning Electron Microscopes (SEMs) can magnify objects up to 100,000 times, revealing intricate details of materials and biological specimens.
2. Confocal Microscopy
Confocal microscopy is a powerful tool that allows scientists to create detailed 3D images of cells and tissues. It's widely used in cell biology and neuroscience to study complex structures.
3. Super-Resolution Microscopy
Beyond the diffraction limit of light, super-resolution microscopy techniques like STED (Stimulated Emission Depletion) and PALM (Photoactivated Localization Microscopy) break barriers, allowing researchers to visualize structures as small as single molecules.
4. Fluorescence Microscopy
Fluorescence microscopy utilizes fluorescent dyes or proteins to tag specific cellular components. It's instrumental in tracking dynamic processes within living cells and studying molecular interactions.
Microscopy in Scientific Discoveries
Microscopy has played a pivotal role in numerous scientific breakthroughs:
- **DNA Structure:** James Watson and Francis Crick's discovery of the double helix structure of DNA in 1953 was made possible through X-ray crystallography and electron microscopy.
- **Cell Theory:** The development of the cell theory, which states that all living organisms are composed of cells, was influenced by the observations made under microscopes by scientists like Robert Hooke and Matthias Schleiden.
- **Nanotechnology:** Microscopy is essential in nanotechnology, enabling scientists to manipulate and study materials at the nanoscale. This has led to innovations in electronics, materials science, and medicine.
Exploring the Nano World
At the university level, you delve into nanoscience, where microscopes reveal the fascinating realm of nanoparticles and nanomaterials. Nanotechnology allows us to engineer materials at the atomic and molecular scale, leading to advances in fields like medicine, electronics, and materials science.
Career Opportunities
Studying advanced microscopy techniques can open doors to exciting careers in research, biotechnology, and materials science. Microscopy specialists are in high demand, working in universities, research institutions, and industries worldwide.
As you progress in your scientific journey, remember that the universe of the small is just as captivating and important as the vastness of the cosmos. Microscopy grants us access to hidden worlds, fostering discoveries that shape our understanding of science and technology.
For further exploration, you can refer to university-level textbooks and research papers in advanced microscopy techniques.
