Difference between revisions of "Light Microscope"
(→Magnification Equation) |
|||
| Line 40: | Line 40: | ||
: A '''light microscope''' cannot be used to view anything smaller than about 0.2 [[micrometre]]s. | : A '''light microscope''' cannot be used to view anything smaller than about 0.2 [[micrometre]]s. | ||
: '''Light microscopes''' can be used to view objects as small as [[bacteria]] but cannot be used to view [[virus]]es. | : '''Light microscopes''' can be used to view objects as small as [[bacteria]] but cannot be used to view [[virus]]es. | ||
| − | + | {| class="wikitable" | |
| + | |[[File:MicroscopeDiagram.png|center|500px]] | ||
| + | |} | ||
| + | *'''Eyepiece Lens''' - This is the lens that you look down. | ||
| + | *'''Coarse Focussing Wheel''' - This moves the stage by a large amount to bring the image into focus (make the image clear and not blurry). | ||
| + | *'''Fine Focussing Wheel''' - This moves the stage by a small amount to focus the image carefully (make the image clear and not blurry). | ||
| + | *'''Objective Lens''' - This is the lens next to the specimen that magnifies the image. | ||
| + | *'''Stage''' - This where the sample is placed. | ||
| + | *'''Light Source''' - This can be a lamp or a mirror used to shine light through the specimen. | ||
===Magnification Equation=== | ===Magnification Equation=== | ||
Image Size = Object Size X Magnification | Image Size = Object Size X Magnification | ||
:<math>Magnification = \tfrac{ImageSize}{ObjectSize}</math> | :<math>Magnification = \tfrac{ImageSize}{ObjectSize}</math> | ||
| + | |||
| + | ===Preparing Specimens=== | ||
| + | To see an object clearly with a '''microscope''' a [[specimen]] must be prepared first. | ||
| + | : 1. A small [[specimen]] is placed on a glass [[slide]]. | ||
| + | : 2. A [[dye]] is used to colour the specimen so it can be seen more easily under the '''microscope'''. | ||
| + | : 3. A cover slip is placed on the [[specimen]] to flatten it. | ||
| + | : 4. Tissue is used to absorb any excess [[dye]]. | ||
| + | : 5. The glass [[slide]] is placed on the '''microscope''' stage. | ||
Revision as of 16:02, 30 March 2019
Contents
Key Stage 2
Meaning

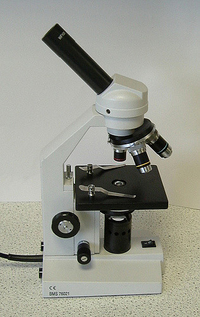
A picture of a microscope.
A microscope is piece of equipment used to make small objects appear larger.
About Microscopes
- Microscopes can be used to see things too small for our eyes to see.
- Micro means 'small' and scope means 'small'.
Key Stage 3
Meaning
A microscope is piece of equipment used to make small objects appear larger.
About Microscopes
- Microscopes use convex lenses to magnify an image.
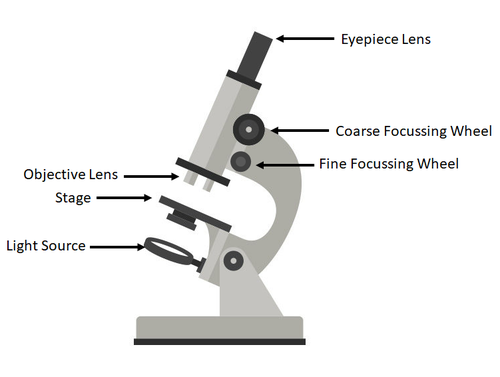
- The parts of the microscope are shown in the diagram below:
- Eyepiece Lens - This is the lens that you look down.
- Coarse Focussing Wheel - This moves the stage by a large amount to bring the image into focus (make the image clear and not blurry).
- Fine Focussing Wheel - This moves the stage by a small amount to focus the image carefully (make the image clear and not blurry).
- Objective Lens - This is the lens next to the specimen that magnifies the image.
- Stage - This where the sample is placed.
- Light Source - This can be a lamp or a mirror used to shine light through the specimen.
Preparing Specimens
To see an object clearly with a microscope a specimen must be prepared first.
- 1. A small specimen is placed on a glass slide.
- 2. A dye is used to colour the specimen so it can be seen more easily under the microscope.
- 3. A cover slip is placed on the specimen to flatten it.
- 4. Tissue is used to absorb any excess dye.
- 5. The glass slide is placed on the microscope stage.
Key Stage 4
Meaning
A light microscope is a device used to observe small objects using visible light.
About Light Microscopes
- A light microscope cannot be used to view anything smaller than about 0.2 micrometres.
- Light microscopes can be used to view objects as small as bacteria but cannot be used to view viruses.
- Eyepiece Lens - This is the lens that you look down.
- Coarse Focussing Wheel - This moves the stage by a large amount to bring the image into focus (make the image clear and not blurry).
- Fine Focussing Wheel - This moves the stage by a small amount to focus the image carefully (make the image clear and not blurry).
- Objective Lens - This is the lens next to the specimen that magnifies the image.
- Stage - This where the sample is placed.
- Light Source - This can be a lamp or a mirror used to shine light through the specimen.
Magnification Equation
Image Size = Object Size X Magnification \[Magnification = \tfrac{ImageSize}{ObjectSize}\]
Preparing Specimens
To see an object clearly with a microscope a specimen must be prepared first.
